Nothing ruins a deep-country hunt faster than a “dead-weight” pack that feels like it’s trying to pull you off the mountain. Whether it’s the constant digging for a rangefinder that should be accessible, or the agonizing lower back strain caused by a heavy load sitting two inches too low, most hunters blame their pack when they should be blaming their internal organization.
The persistent myth among hunters is that the physical exertion of the hunt—the burning lungs on a ridgeline or the aching shoulders at dusk—is an unavoidable tax paid to the wilderness. In reality, modern science reveals that much of this fatigue is not a byproduct of the terrain, but a consequence of biomechanical inefficiency caused by poor pack organization. When the center of gravity of a loadout deviates even slightly from the hunter’s spine, the body enters a state of perpetual micro-compensation. The brain engages proprioception to activate core stabilizers, neck muscles, and the pelvic floor to counteract the “pendulum effect” of a shifting load. By mastering the technical nuances of the Zone Method, Modular Systems, and Compression Packing, the hunter can shift 60% to 80% of the burden from the delicate cervical vertebrae to the powerhouse of the hips, effectively lowering the metabolic cost of every mile.
At Dealibrium, we look at the science of load carriage—specifically the “moment arm” physics and center-of-gravity shifts—to determine how you should pack. By applying ergonomic research to three distinct organization systems, we can transform a 50-pound burden into a balanced extension of your body. This helps you decide between a streamlined Zone approach, a protective Modular system, or a high-volume Compression strategy.
💰Save More with Our Discounts & Coupons!
The Biomechanical Foundation of Hunting Load Distribution
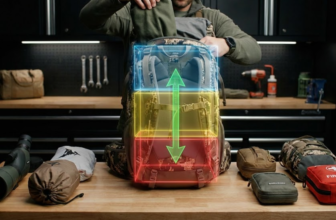
The human body functions as a kinetic chain, and the backpack serves as an external skeletal extension that can either harmonize with or disrupt that chain. To understand pack organization, one must first master the physics of the center of gravity (CoG). The natural CoG of a standing human typically resides just anterior to the second sacral vertebra. When a hunter dons a pack, the system’s CoG moves upward and backward. This shift triggers a “torque” effect, expressed as:
T = r * F
where T is the torque, r is the distance from the spine to the center of the load, and F is the gravitational force of the load. As r increases—meaning the heaviest gear is packed further away from the back—the rotational force pulling the hunter backward increases exponentially. To remain upright, the hunter must lean forward, causing the abdominal muscles to overwork and the lumbar discs to experience asymmetric compression.
The Center of Gravity Principle: Vertical and Horizontal Alignment
The most critical insight from ergonomic research is the “Core Zone” principle. Data suggests that roughly 60% to 70% of a pack’s total weight must be concentrated in the upper-middle section, specifically between the shoulder blades and as close to the frame as possible. This placement aligns the pack’s CoG with the hunter’s own, facilitating a “tall, stable column” of weight that moves with the body rather than against it.
Horizontal alignment is equally vital. Loading one side of the pack heavier than the other induces lateral flexion in the spine, leading to uneven muscle activation and potential long-term musculoskeletal injury. A symmetrical loadout ensures that the pressure is distributed evenly across the pelvic girdle and the iliac crest.
How Do I Stop My Backpack from Pulling Me Backward? (The Zone Method)
The Zone Method is a pack organization strategy based on human biomechanics that places the heaviest items closest to the wearer’s spine and centered between the shoulder blades. By minimizing the horizontal distance between the load’s center of mass and your own, you reduce the “leverage” the pack has against your erector spinae muscles.
If you place your heavy spotting scope or water bladder at the very bottom or the outside of the pack, you create a “moment arm” that pulls your torso backward. Your body compensates by leaning forward, causing premature fatigue in your hips and lower back.
Pro Tip: Think of your pack as a “saddle.” Keep the heavy “weight” (meat, water, glass) against the frame in the middle “Zone 2,” and use your soft clothing as “mortar” to fill the gaps and prevent the heavy items from shifting.
💰Save More with Our Discounts & Coupons!


Hip-to-Shoulder Load Ratios: Optimizing the 70/30 Distribution
Properly engineered hunting packs, such as those with internal carbon fiber frames or external load-hauling systems, are designed to transfer the vast majority of weight to the hips. Academic studies on gait mechanics emphasize that a successful carry involves a specific ratio: 70% of the load on the hips and 30% on the shoulders.
| Load Distribution Component | Percentage of Weight | Primary Biomechanical Role |
| Hip Belt | 60% – 80% | Directs force to the pelvic girdle; utilizes strongest leg muscles. |
| Shoulder Straps | 20% – 40% | Stabilizes the load; prevents backward sway; manages lateral balance. |
| Sternum Strap | N/A | Alleviates shoulder pressure; distributes weight across the chest. |
| Load Lifters | N/A | Changes the angle of the pack to pull weight tight against the spine. |
Failure to achieve this ratio often stems from improper fit. A pack must be sized to the hunter’s torso length—measured from the C7 vertebra at the base of the neck to the iliac crest at the top of the hip bones. If the pack is too short, the hip belt sits too high, and the weight remains on the shoulders. If it is too long, the pack sags, creating a lever effect that pulls the hunter backward.

Pro-Tip: The “Hunch and Cinch” Adjustment
When donning a loaded pack, the hunter should hunch their shoulders to lift the pack slightly, then tighten the hip belt as firmly as possible around the navel area. Once the shoulders are released, the majority of the weight should “hover” on the hips, with the shoulder straps providing only enough tension to keep the pack flush against the back.
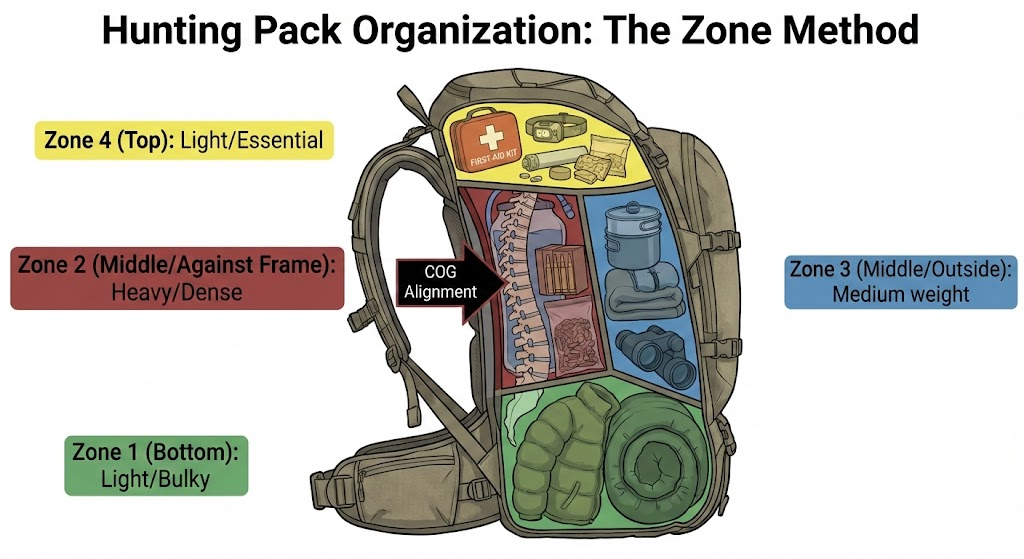
The Zone Method: Strategic Vertical Layering
The Zone Method is the scientific standard for internal pack organization. It organizes gear into three distinct vertical zones based on weight, frequency of use, and metabolic impact. This system ensures that the hunter remains agile on uneven terrain and can respond quickly to game encounters.
Zone 1: The Base Layer (Bottom Section)
The bottom of the pack is the designated space for light, bulky gear that the hunter will not need until establishing camp. This includes the sleep system (sleeping bag and pad), bivy gear, and spare base layers. Packing these items at the bottom serves as a physical buffer, protecting the gear from ground impact and providing a stable foundation for the heavier items in the core zone.
From an ergonomic perspective, keeping light items at the bottom prevents the pack’s center of gravity from dropping too low. A low-slung, sagging pack creates a “sagging weight” that forces the hunter to over-tighten shoulder straps, which can compress the brachial plexus and cause numbness in the arms.
Zone 2: The Core Layer (Middle Section against the Spine)
This is the most critical area for load-bearing efficiency. The Core Zone—positioned between the shoulder blades and snug against the frame—should house the heaviest items in the loadout.
- Hydration: Water bladders should be placed in a dedicated sleeve against the frame.
- Optics: Spotting scopes and tripods should be centered vertically.
- Food: Dense, calorie-heavy rations should be packed in this zone.
- Kill Kit: Heavy items such as knives, bone saws, and game bags belong here.
By centering this weight high and tight, the hunter minimizes the moment arm of the load, significantly reducing energy expenditure during steep ascents.
Zone 3: The Top and Accessory Layer (Accessibility Strategy)
The top lid (the “brain”) and the outer pockets are reserved for “One-Motion” essentials. Accessibility is the primary driver in this zone. Items that might be needed in a sudden rainstorm or a low-light tracking scenario must be reachable without unzipping the main compartment.
- Safety & Navigation: First aid kits, headlamps, GPS units, and maps.
- Weather Protection: Rain shells and lightweight insulation layers (puffy jackets).
- Communication: Radios and emergency whistles.
- Consumables: Quick snacks and water filtration tablets.
The Lateral Balance Rule: Tripods and Rifles
Hunters often overlook the side-to-side distribution of weight. Carrying a heavy spotting scope in a side pocket without a counter-balancing weight on the opposite side will eventually cause “lateral lean,” leading to hip fatigue. If a rifle or bow is attached to the pack, it must be positioned as close to the frame as possible, ideally centered, to prevent it from acting as a lever that throws off the hunter’s stride.
💰Save More with Our Discounts & Coupons!
Modular Packing: The Precision of Segmented Gear
Modular packing is the practice of subdividing a large pack’s volume into smaller, discrete units using stuff sacks, dry bags, or zippered pouches. This method is often contrasted with the “stuff method,” where gear is loosely crammed into the pack to fill every available air pocket.
The Technical Case for Modularity
The primary advantage of modular packing is operational speed. In a backcountry scenario, the ability to pull a single “Camp Kitchen” bag or “Kill Kit” bag from a packed bag saves significant time and prevents the “gear explosion” often seen at evening campsites.
| Modular Component | Typical Items | Technical Benefit |
| Kill Kit | Knife, bags, tags, paracord. | Rapid response for field dressing; keeps blood separate from other gear. |
| Camp Kitchen | Stove, fuel, cookware, food. | Centralizes heavy and potentially noisy metal items. |
| Electronics Bag | GPS, power bank, cables, headlamp. | Redundant waterproofing; prevents cable tangling. |
| Clothing Module | Extra socks, base layers, insulation. | Provides a “pancake” structure that helps stabilize the core zone. |
Modularity also provides an additional layer of protection. Using color-coded dry bags not only aids in identification but ensures that if a water bladder leaks or the hunter falls into a stream, critical items like down jackets or fire starters remain dry.
Why Does My Gear Get Crushed or Lost? (The Modular System)
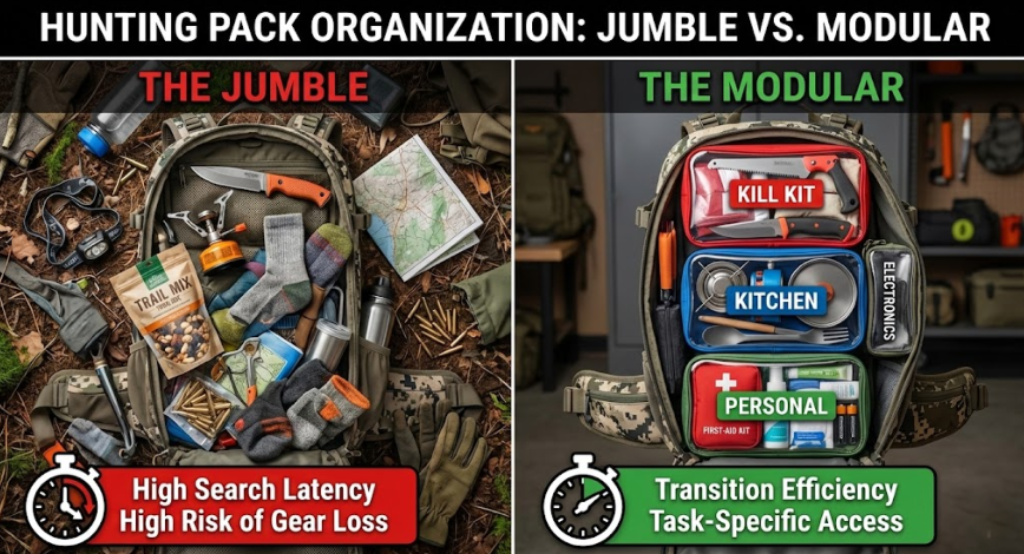
Modular Packing involves using independent, often color-coded, storage “cells” or dry bags to categorize gear by task (e.g., Kill Kit, First Aid, Cooking). This system prioritizes organizational “latency”—the time it takes to transition from one activity to another—and protects delicate electronics from moisture and pressure.
While it adds a few ounces of weight in the form of extra pouches, the efficiency gain is massive. In a high-stress situation, such as an approaching storm or a successful harvest at dusk, you aren’t dumping your entire pack to find a headlamp; you are grabbing the “Light & Safety” module.
Pro Tip: Use transparent or mesh-topped power-mesh bags for your Kill Kit. Being able to see your game bags and tags through the fabric prevents the “did I bring it?” panic when you’re standing over a downed animal.
External Modular Add-Ons: Expanding the Frame
High-end hunting packs often utilize modular frame systems where the bag can be swapped depending on the mission duration. Furthermore, external pouches can be added to the hip belt or shoulder straps to maximize accessibility.
- Side Car Pouches: Zippered storage for rangefinders or optics.
- Bottom Pouches: Ideal for stowing a phone or a quick-access med kit under the main bag.
- Elastic Organizers: Multi-cell elastic strips that secure ammo or calls inside a pocket to prevent them from “jingling”.
The “Brick and Mortar” Hybrid Approach
The most efficient packers use a hybrid “brick and mortar” strategy. They pack modular bags as “bricks” and then use “mortar”—loose soft goods like spare socks or gloves—to fill the gaps between the bags. This creates a dense, non-shifting load that eliminates the “sloppy load” syndrome, which can fatigue stabilizing muscles over long distances.
Compression Packing: Volume Optimization vs. Insulation Integrity
Compression packing utilizes mechanical force—either through secondary zippers or vacuum-style one-way valves—to reduce the volume of soft gear. While highly effective for fitting more gear into a smaller pack, it carries technical risks that the hunter must manage.
Can I Fit a 5-Day Trip into a 3-Day Pack? (Compression Packing)
Compression Packing utilizes mechanical force via integrated straps or specialized compression dry bags to remove “dead air” from bulky items like sleeping bags and insulating layers. Based on Boyle’s Law, reducing the volume of a gas (air trapped in down) allows for higher density packing, significantly increasing your pack’s effective capacity.
However, there is a technical trade-off: over-compressing high-loft down (like 850-fill power) for long periods can damage the delicate plumules, reducing the gear’s thermal efficiency over time. Use compression to get to camp, but release the tension as soon as you arrive.
The Science of Loft and R-Value
Insulation gear, such as down sleeping bags and puffy jackets, provides warmth by trapping air in “loft.” When these items are compressed, the air is removed, and the volume is reduced by up to 60%. However, prolonged compression can damage the structure of the insulation, particularly down clusters or synthetic fibers, leading to a permanent loss of R-value (thermal resistance).
Pro-Tip: The “Approach-Only” Compression Rule
Only compress bulky insulation during the active hiking phase of the trip. Once you reach camp, immediately remove the sleeping bag and jacket from their compression sacks to allow the fibers to “re-loft.” Never store compressed gear at home; use large mesh storage bags to maintain the integrity of the fill.
Volume vs. Weight: The Compression Trap
A common error is equating reduced volume with reduced weight. Compression allows a hunter to use a smaller, lighter daypack for a multi-day trip, but it can lead to a “dense” load that feels like a “non-conforming bulge” against the spine. If the compressed gear is not packed flat against the frame, it creates pressure points that can lead to Teres Minor muscle inflammation or shoulder bursitis.
💰Save More with Our Discounts & Coupons!

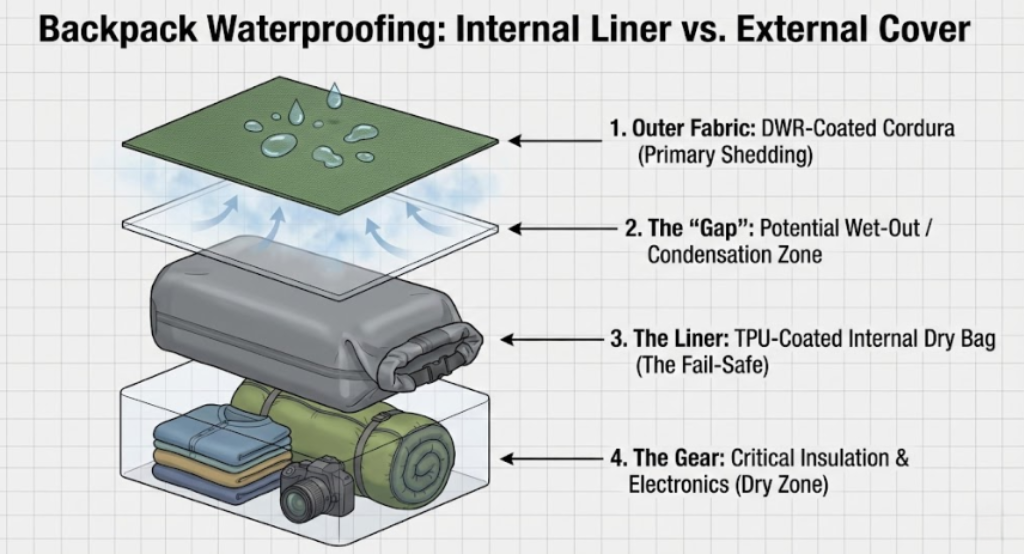
How Do I Keep My Gear Dry Without a Rain Cover? (Waterproofing Techniques)
Modern waterproofing science has moved beyond the external rain cover, which often acts as a sail in high winds. Advanced hunters use “Internal Liners” (like heavy-duty polyethylene) or TPU-coated dry bags. This creates a redundant barrier that protects gear even if the outer Cordura fabric of the pack “wets out” and loses its DWR (Durable Water Repellent) effectiveness.
The Dealibrium Take: System Comparison
| Feature | Zone Method | Modular System | Compression Packing |
|---|---|---|---|
| Best For | Heavy Load Hauling | High-Speed Transitions | Extreme Bulk Reduction |
| Weight Distribution | Superior (Static) | Good (Variable) | Moderate (Dense) |
| Accessibility | Low (Internal Digging) | High (Grab & Go) | Moderate (Must Unstrap) |
| Gear Protection | Low | High (Individual Barriers) | Low (Crush Risk) |
| Real World Use | Meat Packing / Heavy Glass | Multi-Day Backcountry | Late Season (Bulky Gear) |
Technical Waterproofing: IPX Standards and Scent Control
In the hunting environment, waterproofing is a multifaceted requirement. It must protect the gear, maintain the hunter’s thermal regulation, and minimize the broadcast of human odors.
Fabric Technology and DWR
The first line of defense is the fabric itself. Materials like Cordura provide natural abrasion resistance and can be treated with Durable Water Repellent (DWR) coatings. DWR causes water to bead up and roll off the surface, preventing the fabric from “wetting out.” However, DWR is a surface treatment that degrades with use and must be reapplied using specialized sprays to maintain performance.
The IPX8 Standard: Submersion vs. Splash
For hunters operating in waterfowl blinds or crossing deep sloughs, the IPX8 rating is the gold standard. This rating indicates that the gear can withstand continuous submersion beyond 1 meter.
- TPU Shells: Thermoplastic Polyurethane is non-porous and more durable than standard fabric coatings. It maintains its integrity through hundreds of submersions.
- Magnetic Seals: Unlike roll-top bags which can leak under pressure, magnetic closures (like Fidlock systems) create an airtight and gas-tight seal.
Scent Control: The Gas-Tight Barrier
One of the most profound benefits of high-tech waterproofing is scent containment. Because whitetail deer can detect human scent from over 200 yards, containing odors inside a gas-tight bag can be the difference between success and failure.
Traditional backpacks, even those with rain covers, allow air exchange through the back panel and zippers. An airtight TPU bag with a magnetic seal eliminates this exchange, preventing scent molecules from coffee, food, or used clothing from reaching the wind.
| Waterproofing Method | Noise Level | Scent Control | Technical Limit |
| External Rain Cover | High (flaps in wind) | Poor (leaks at back) | Only protects $70\%$ of the bag. |
| Internal Dry Bags | Low (silent) | Moderate | Does not prevent bag saturation. |
| IPX8 TPU Pack | Moderate | Superior (gas-tight) | Heavy and expensive. |
| Contractor Bags | High (crinkly) | Poor | Prone to punctures and holes. |
💰Save More with Our Discounts & Coupons!

Accessibility Strategies for Mission-Specific Hunts
The way a pack is organized must evolve based on the “mission.” A day hunt in a whitetail stand requires different accessibility priorities than an expedition-level elk hunt in the backcountry.
The Whitetail Day Hunt: Mobility and Stealth
For short-duration day hunts, the goal is “Minimalist Stealth.” The pack should be small—ideally 1,500 to 3,000 cubic inches—and focus on immediate access to glassing and scent-control gear.
- Top Compartments: Binoculars, rangefinders, grunt calls, and scent-eliminating sprays.
- External Loops: Haul ropes for tree stands and harness attachments.
- Noise Dampening: All metal zipper pulls should be replaced with cordage to eliminate high-frequency clicks that spook game in silent woods.
The Backcountry Elk Hunt: Endurance and Capacity
Backcountry hunts require a “Pillar and Cluster” approach. The “Pillar” is the main frame and bag (typically 5,000 to 7,000+ cubic inches), while “Clusters” are modular bags for food, camp, and survival.
- Meat-Hauling Mechanics: Success requires the ability to transport heavy meat. Modern “Load Shelves” allow the hunter to separate the bag from the frame, placing the heavy meat directly against the carbon fiber stays for optimal center of gravity.
- The Multi-Point Method: On extremely long pack-outs, hunters should use the “multi-point” method, shuttling loads to manageable drop points to provide “moving rest periods” for the stabilizing muscles.
Waterfowl Hunting: Buoyancy and Protection
Waterfowl gear organization prioritizes protection from rising water and mud. A waterproof backpack with “positive buoyancy” is critical; if dropped in a marsh, it should float for easy retrieval.
- Buoyancy Advantage: An airtight seal traps air, which can reduce drowning risk by $50\%$ by serving as a temporary emergency float.
- Internal Dividers: Separate compartments for ammo, electronics, and duck calls ensure that even if one pocket is opened in the rain, the rest of the gear remains isolated.
Troubleshooting the Load: Identifying and Correcting Pain
Musculoskeletal pain is the body’s signal that the pack organization or fit has failed. Understanding specific muscle groups can help a hunter diagnose the issue in the field.
The Teres Minor and Shoulder Pain
The Teres Minor is a small muscle in the shoulder that is easily fatigued by poor weight distribution. If your shoulders are “screaming,” the shoulder straps are likely too tight, or the load is pulling backward, forcing the rotator cuff to stabilize the pack.
- Correction: Lean forward to shift the weight to the back, tighten the hip belt, and use the “load lifters” to pull the top of the pack 45° toward the frame.
The Piriformis and Hip Discomfort
Pain in the “right butt cheek” or lower hip often points to the Piriformis muscle. This is caused by an uneven load that forces the pelvis to tilt, or a hip belt that is cinched too low, restricting the natural range of motion of the hip joint.
- Correction: Re-balance the pack laterally. Ensure the hip belt is wrapping around the iliac crest, not sitting below it on the glutes.
Gait Mechanics and “Forward Lean”
Excessive forward lean is a sign that the center of gravity is too high or too far from the spine. This lean increases cardiorespiratory responses and places undue stress on the lumbar intervertebral discs.
- Correction: Move heavy water bladders and food bags lower and closer to the frame. A “Neutral Posture” is the goal for energy efficiency.
Conclusions: The Technical Future of Pack Dynamics
The transition from “traditional packing” to “scientific organization” is an essential evolution for the modern hunter. By utilizing the Zone Method, the hunter honors the biomechanical constraints of the human spine. Through modularity, they achieve operational speed and equipment longevity. With technical waterproofing and compression, they master the environmental variables of the hunt.
As fabric technology advances toward lighter, ultra-high-molecular-weight polyethylene (UHMWPE) and airtight magnetic closure systems, the barrier between the hunter and the wilderness continues to thin. However, the “Source of Truth” remains the same: a pack is only as effective as its distribution of weight. Mastery of the 70/30 hip-to-shoulder ratio and the stabilization of the center of gravity will always be the defining factors in backcountry success.
Your To-do list:
- Balance over Bulk: Prioritize the Zone Method for any pack over 30 lbs to protect your spine.
- Task-Based Logic: Use a Modular System for your “Kill Kit” and “Kitchen” to reduce transition time in the field.
- Release the Pressure: Use Compression for the hike in, but let your insulation “breathe” once you reach camp to maintain thermal performance.
💰Save More with Our Discounts & Coupons!
Frequently Asked Questions
This “pulling away” sensation is typically caused by a lack of internal structure or poor tensioning. If you are using a frameless pack, ensure you have a “virtual frame” created by a folded sleeping pad. If using a framed pack, tighten your load-lifter straps at a 45° angle toward the pack. This pulls the top of the load flush against your shoulder blades, neutralizing the backward “torque” that forces your body to overcompensate.
Always place the water bladder in the dedicated sleeve directly against the frame or centered in the middle of “Zone 2” (between the shoulder blades). Because water is one of the densest items in your kit, keeping it as close to your spine as possible prevents the pack from swaying and ensures the weight stays on your hips rather than pulling your shoulders back.
For a day hunt, aim for 1,200 to 3,000 cubic inches. Multi-day trips require 3,000 to 5,000 cubic inches, and expedition-length hunts (7+ days) require 5,000 to 7,000+. A general rule of thumb is 1,000 cubic inches per day of the hunt, though modular systems allow you to compress larger bags for shorter missions.
While specific calorie counts vary, research indicates that poorly distributed loads increase energy expenditure through increased trunk lean, elevated cardiorespiratory response, and higher foot-ground pressures. An unbalanced pack forces non-essential muscles to work as stabilizers, leading to premature muscular fatigue and a significantly reduced overall endurance.
For the serious backcountry hunter, an internal liner or individual TPU dry bags are significantly superior to an external rain cover. Rain covers act as a sail in high winds, snag on brush, and fail to protect the back panel where moisture can seep into the pack from your own sweat or wet clothing. An internal liner creates a redundant, waterproof barrier that ensures your gear stays dry even during a deep creek crossing or a full-day deluge, all while maintaining a silent, streamlined profile.
Short-term compression (under 12 hours) is safe. However, never store your down gear in compression bags between hunts. This “crushes” the loft, permanently reducing the jacket’s ability to trap heat and keep you warm.
Noise reduction is a two-front battle: internal organization and external friction. To stop internal “jingle,” wrap metal-on-metal items like stove kits or extra magazines in soft goods (spare socks or base layers) and cinch all external compression straps to eliminate gear shift. To solve external “squeaking,” which is usually caused by friction between the frame stays and the pack fabric, apply a small amount of unscented wax or kinetic lubricant to the contact points. Finally, replace all metal zipper pulls with paracord or bank line to eliminate the high-frequency “clinking” that can alert game in silent timber.