So, you’ve made the smart choice to invest in an ergonomic keyboard. That’s a huge first step toward better comfort and health. But unboxing it is one thing; using it correctly is another. An improper setup can undermine all the benefits and leave you just as uncomfortable as before.
Don’t worry. This is your complete, risk-free guide. We’ll walk you through the process from the ground up, making your ergonomic keyboard setup feel easy and intuitive. These simple, step-by-step instructions will help you achieve the perfect posture, avoid common beginner mistakes, and unlock the pain-free typing you were promised.
💰Save More with Our Discounts & Coupons!
- 1
- 2
- 3
- …
- 6
- Next Page »
The Goal: Achieving a “Neutral” Posture
Before we start adjusting things, what are we aiming for? The goal is a “neutral wrist” and body position. This means your joints are naturally aligned, minimizing stress on your muscles and tendons. Think straight lines: your forearms, wrists, and hands should form a straight line, and your shoulders should be relaxed, not hunched.
Your 5-Step Ergonomic Keyboard Setup Guide
The best way to achieve a perfect setup is to start with your body and work your way out to the equipment. Follow these steps in order.

Step 1: Adjust Your Chair Height (The Foundation)
Your chair is the foundation of your entire posture. Before you even touch your keyboard, adjust your chair to create the right base.
- Sit Back: Your back should be resting comfortably against the chair’s lumbar support.
- Feet Flat: Adjust your chair height so that your feet are flat on the floor (or on a footrest) and your thighs are roughly parallel to the ground. Your knees should be at about a 90-degree angle.
Step 2: Set Your Keyboard Height (The 90-Degree Rule)
This is where the keyboard first comes into play. The goal is to position it so your arms can remain relaxed.
- Aim for 90 Degrees: Place your keyboard at a height where your elbows are bent at approximately a 90-degree angle when you type.
- Why It Matters: This allows your shoulders to remain relaxed and your arms to rest comfortably at your sides, preventing hunching and neck strain. You may need to adjust your desk height or use a keyboard tray to achieve this.
Step 3: Position Your Keyboard and Set the Tilt (The Most Important Step)
This is where you unlock the main ergonomic benefit and correct the biggest mistake most people make.
- Keyboard Distance: Place the keyboard directly in front of you and close enough that your elbows can stay comfortably by your sides, not reaching forward.
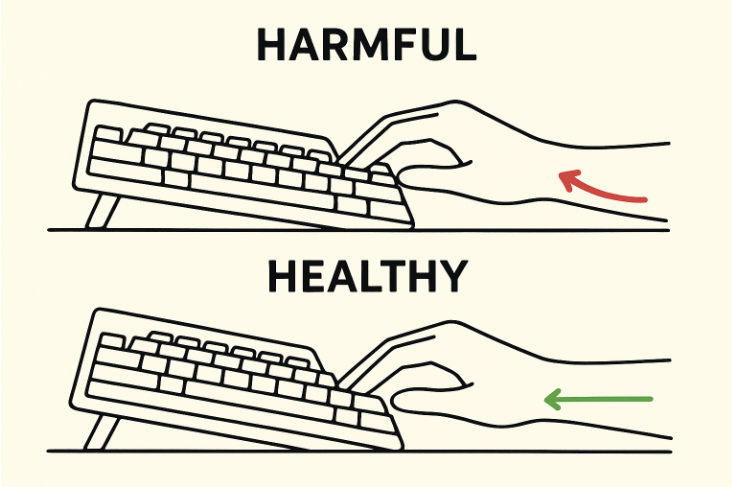
- The Keyboard Tilt: Stop using the pop-up feet on your keyboard. Those feet create a “positive tilt” that bends your wrists upward (wrist extension), which is a primary cause of strain. For a healthy, straight wrist position, your keyboard should be flat or, even better, have a “negative tilt” (angling slightly away from you).
Step 4: Position Your Mouse
Your mouse position is just as important as your keyboard’s.
- Keep it Close: Position your mouse as close to your keyboard as possible. This minimizes the reach your shoulder and arm have to make every time you switch from typing to mousing. This is one of the key benefits of using a compact (TKL or 60%) ergonomic keyboard.
💰Save More with Our Discounts & Coupons!
- 1
- 2
- 3
- …
- 6
- Next Page »
Step 5: Adjust Your Monitor Height
The final step is to make sure your keyboard setup doesn’t create a new problem for your neck.
- Eye Level: Position your monitor directly in front of you, with the top of the screen at or just below your eye level. This keeps your neck in a neutral, relaxed position.
Beyond Setup: 3 Habits for Lasting Comfort
Your initial ergonomic keyboard setup is huge, but maintaining that comfort requires building good habits.
- Use a Light Touch and Float Your Wrists: Many beginners make the mistake of resting their wrists heavily on a wrist rest while actively typing. Your wrists should ideally “float” just above the keyboard, with your larger arm muscles doing the work of moving your hands. Use a light touch instead of pounding on the keys to reduce finger impact and strain.
- Use Wrist Rests Correctly: A wrist rest is actually a “palm rest.” Its purpose is to provide support for the heels of your palms during pauses from typing, not to prop up your wrists while you are actively keying.
- Take Regular Breaks: Ergonomics isn’t just about static positions; it’s also about movement. Incorporate short, regular breaks to stand up, stretch your hands, and give your muscles a rest.
Conclusion: Making Comfort Your New Default
Switching to an ergonomic keyboard setup can feel strange at first, but it is one of the most powerful changes you can make for your daily comfort and long-term health. By following these simple, ground-up steps, you can create a workspace that fits your body, not the other way around. By getting the height, tilt, and position right, you’ll reduce strain, boost your focus, and make typing feel effortless again.
💰Save More with Our Discounts & Coupons!
- 1
- 2
- 3
- …
- 6
- Next Page »
Frequently Asked Questions (FAQ)
For a healthy, neutral wrist position, it is always better to have your keyboard lying completely flat or angled slightly away from you (a negative tilt). Never use the pop-up feet to tilt the keyboard up towards you, as this causes harmful wrist extension.
There can be a short adjustment period, especially if you switch to a split keyboard. However, by following a proper ergonomic keyboard setup guide like this one, most users adapt within a few days to a week and find the comfort benefits well worth the initial change.
The most ergonomic position involves keeping your joints neutral. Your feet should be flat on the floor, your elbows bent at a ~90-degree angle close to your body, your forearms parallel to the floor, and your wrists kept straight as you type.