As jacket technology evolves, a manufacturing innovation is emerging that could transform how insulated jackets are engineered. Spacer stitching—a technique published in peer-reviewed research —represents a fundamental shift from traditional seam sealing to engineered thermal solutions built into the jacket at the factory stage.
This article explains the latest advances in thermal bridging prevention, compares cutting-edge baffle designs, and helps you understand whether premium technology is worth the investment for your use case.
Back to basic thermal bridging guide: Why Your Jacket Has Cold Lines
The Future of Jacket Engineering: Spacer Stitching Explained
For decades, seam sealing with adhesive tape has been the only retrofit solution for stitched-through jackets. But recent research reveals a manufacturing alternative that achieves sealing performance at the factory stage: spacer stitching.
What is spacer stitching?
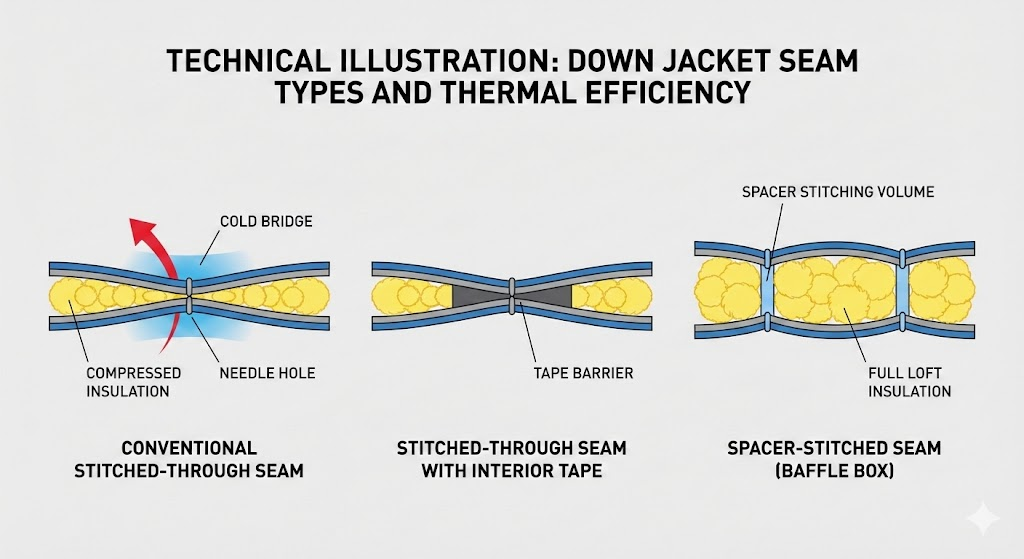
Spacer stitching uses a special stitch structure that maintains 3D space between fabric layers and insulation. Unlike conventional stitching (which pulls layers tightly together), spacer stitching prevents the compression that causes thermal bridging.
The engineering difference is subtle but critical: conventional thread goes through all layers vertically; spacer thread maintains horizontal separation, preventing down loft from collapsing at the stitch line.
Peer-reviewed research findings:
Researchers at a major textile and apparel research lab tested identical 500-gram down jackets using advanced thermal manikins (Thermetrics equipment with 20 independent heating zones). The test compared:
- Conventional stitch-through
- Conventional stitch-through with factory-applied seam tape
- Spacer-stitched stitch-through
Results (measured in clo units, the standard thermal resistance measurement):
| Construction | Still Air, Static | 3 m/s Wind, Static |
|---|---|---|
| Conventional stitch-through | 3.1 clo | 2.4 clo |
| Conventional + seam tape | 3.5 clo | 3.2 clo |
| Spacer-stitched stitch-through | 3.5–3.7 clo | 3.4–3.5 clo |
| Box wall (reference) | 4.4 clo | 4.0 clo |
What this means:
Spacer stitching achieves the same thermal performance as seam tape, without requiring post-purchase tape application. It’s factory-engineered warmth, not retrofit warmth.
When tested in wind (where thermal bridging becomes critical), spacer-stitched jackets maintain warmth far better than conventional stitches and nearly as well as sealed seams.
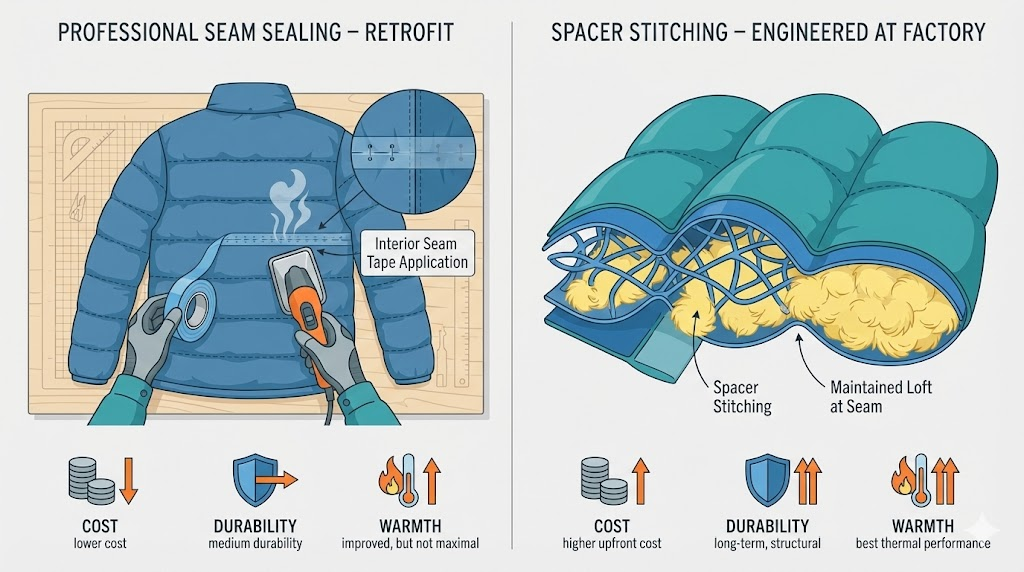
How spacer stitching differs from seam sealing:
| Aspect | Conventional + Sealing Tape | Spacer Stitching |
|---|---|---|
| Application timing | After manufacturing (retrofit) | During manufacturing (engineered) |
| Installation effort | Factory labor or DIY | Factory automated |
| Durability | 2–5 seasons (degrades with washing) | Permanent (engineered into structure) |
| Visible seams | Tape visible on interior | No visible tape; seam looks normal |
| Cost | $20–50 added to jacket price | $30–80 added to jacket price |
| Thermal performance | 60–75% of lost insulation recovered | 70–80% of lost insulation recovered |
| Consistency | Variable (depends on application quality) | Consistent (factory-controlled) |
Spacer stitching is superior to tape sealing because it’s engineered into the manufacturing process. There’s no adhesive to degrade with washing, no tape to peel, and no quality variation from application technique.
💰Save More with Our Discounts & Coupons!

Why this is game-changing:
Before spacer stitching, you faced a choice:
- Buy a cheap stitch-through jacket and seal seams yourself ($50–120, 2–3 hours work)
- Buy a heavier/bulkier box-wall jacket ($200–300 premium)
- Buy a factory-sealed jacket (cost passed to consumer)
With spacer stitching, you get sealing performance without DIY effort or weight penalty. It’s engineered into the manufacturing process.
Current adoption:
Only premium brands have implemented spacer stitching so far:
- Rab: Alpine jacket line (flagship models)
- Arc’teryx: Expedition-grade products
- Patagonia: Select premium down jackets
Manufacturing requires specialized stitching machinery, which is why adoption is limited to high-volume manufacturers. These brands can justify the equipment investment; smaller brands cannot—yet.
Expected timeline:
Spacer stitching will cascade to mid-range brands ($300–500 price point) within 2–3 years as equipment becomes more accessible and manufacturing techniques standardize. Within 5 years, it could become the industry standard for stitch-through jackets, the way Gore-Tex became standard for rain shells.
How Moisture Amplifies Thermal Bridging
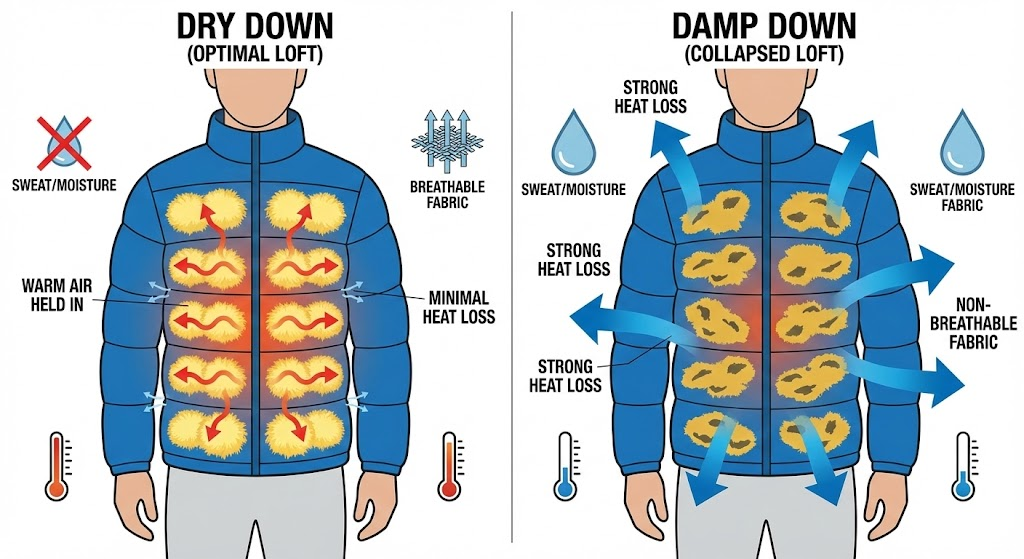
Here’s a hidden problem most jacket articles ignore: when down insulation gets damp (from sweat trapped inside a jacket without adequate breathability), it loses loft, and thermal bridging becomes much worse.
Why moisture matters to thermal bridging:
When down fibers absorb moisture, they collapse and clump. The three-dimensional fluffiness that traps warm air disappears. This happens throughout the jacket, but it’s especially critical at seam points where down is already compressed by stitching.
Even sealed seams can’t overcome moisture-compromised insulation. When the down itself has lost loft, the seam sealing becomes irrelevant.
Real-world example:
Compare two scenarios wearing the same sealed stitch-through jacket:
- Dry conditions, 0°C, no exertion: Adequate warmth; seam sealing does its job, cold spots barely noticeable.
- Active hiking, 15°C, 2 hours of sustained effort: Sweat accumulates inside (because of limited breathability); down loft is compromised by moisture; the same jacket feels noticeably colder even though seams are sealed.
The difference isn’t the sealing—it’s the down. Moisture degrades insulation performance independently of thermal bridging.
The breathability connection:
A sealed stitch-through jacket is only as warm as its breathability allows. Consider two jackets:
- Jacket A: Good seam sealing, poor MVTR (breathability)
- Result: Moisture traps inside → down compresses → thermal bridges amplified
- Jacket B: Good seam sealing, good MVTR (breathability)
- Result: Moisture escapes → down maintains loft → seals work as intended
This is why comparing thermal bridging in isolation is incomplete. You’re not just buying seam construction—you’re buying an insulation system that includes both baffle design AND breathability.
The implication for jacket selection:
Don’t evaluate seam quality and baffle construction without also checking MVTR (moisture vapor transmission rate). A well-sealed jacket with poor breathability will underperform in any activity that generates significant sweat—hiking, climbing, skiing, or trail running.
If you’re buying a jacket primarily for sitting still in cold (hunting, mountaineering bivvys), breathability is less critical because you’re not generating much sweat. But for mixed-activity use or high-exertion wear, breathability is as important as seam sealing.
The system approach:
- Sealed seams: Prevent thermal bridging at stitch points
- Good MVTR: Prevents moisture from degrading down loft
- Together: You get stable insulation performance across a range of activities and conditions
Together, they create a complete thermal system. One without the other is incomplete thermal management.
Resource: Learn more about MVTR and breathability in our guide: Moisture Vapor Transmission Rate (MVTR): Why Breathability Matters More Than Waterproofing
💰Save More with Our Discounts & Coupons!

When Spacer Stitching vs. Offset Baffles vs. Box-Wall: The Advanced Decision Framework
Now that you understand the four primary baffle constructions (stitch-through, offset, box-wall, and spacer-stitched), here’s how to choose based on your activity and budget.
Spacer-stitched stitch-through ($350–600):
Best for:
- Active hiking and mountaineering (60%+ movement)
- Multi-day expeditions where pack weight matters
- Buyers who want engineered warmth without box-wall bulk
- Anyone willing to pay for cutting-edge technology
Performance in static cold: Good (3.5–3.7 clo)
Performance in wind: Very good (3.4–3.5 clo)
Weight: Lightest
Packability: Excellent
Why choose it: You get sealed-seam-equivalent performance without DIY tape application or box-wall weight penalty. Engineered warmth is built in at the factory.
Offset baffles ($400–650):
Best for:
- Alpine climbing (need warmth without excessive bulk)
- Ski mountaineering (balance active mobility with cold-spot prevention)
- Sleeping bags (the industry standard; nearly universal in premium bags)
- Static and active mixed use
Performance in static cold: Excellent (3.5–3.8 clo)
Performance in wind: Good (3.2–3.5 clo)
Weight: Moderate
Packability: Good
Why choose it: Nearly box-wall warmth with significantly less weight. The warmth-to-weight ratio is optimal for serious mountaineers who spend days in camps or bivvys.
Box-wall ($500–900):
Best for:
- Static cold-weather use (hunting, mountaineering sits)
- Extreme expeditions where maximum warmth is sole priority
- Buyers who need the widest thermal performance margin
- Professional guides and mountaineers
Performance in static cold: Excellent (4.0–4.4 clo)
Performance in wind: Very good (4.0 clo)
Weight: Heavy
Packability: Fair
Why choose it: Maximum warmth in all conditions. The gold standard for extreme cold where every fraction of a degree matters. Weight is not a concern.
Sealed stitch-through (traditional) ($300–500):
Best for:
- Active users (hiking, trail running, climbing)
- Budget-conscious buyers
- Hybrid use where you don’t sit still for extended periods
- Anyone who doesn’t need engineered innovations
Performance in static cold: Good (3.5 clo)
Performance in wind: Good (3.2 clo)
Weight: Light
Packability: Excellent
Why choose it: Best overall value. Proven technology, reasonable price, adequate warmth for most uses. Not cutting-edge, but reliable.
Decision matrix:
| Activity Pattern | Primary Climate | Budget | Best Choice |
|---|---|---|---|
| 70% active, 30% static | Alpine/mountain | $350+ | Spacer-stitched stitch-through |
| 50% active, 50% static | Alpine/mountain | $400+ | Offset baffles |
| 30% active, 70% static | Extreme cold | $500+ | Box-wall |
| 80%+ active | Variable | $300+ | Sealed stitch-through |
| 50/50 mixed | Variable | $400+ | Offset baffles (best compromise) |
The Science Behind Advanced Baffle Design: Thermal Manikin Testing Standards
Understanding how jackets are tested helps you interpret performance claims and make informed buying decisions.
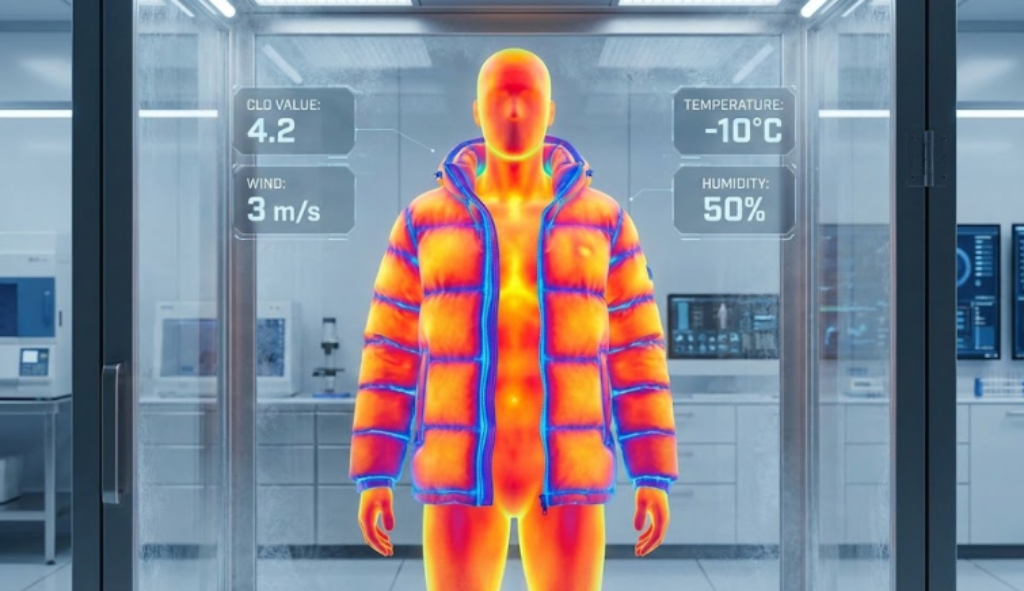
ISO 11092 and ASTM F1291 Standards:
The gold standard for jacket thermal testing uses thermal manikins that can measure heat loss with precision. These standards define:
- Clo unit: The thermal resistance unit (1 clo = 0.155 m²K/W)
- Body segments: Typically 10–20 independent heating zones (head, torso, arms, legs)
- Temperature maintenance: Skin surface maintained at 33–35°C
- Measurement: Power consumption (in watts) needed to maintain temperature
What the data means:
When you see a jacket rated “4.0 clo,” it means the jacket can maintain a 33°C skin surface with approximately 4.0 units of thermal resistance under standard test conditions.
For reference:
- Business suit = 1.0 clo
- Heavy winter coat = 2.5–3.5 clo
- Premium expedition down jacket = 4.0–5.0 clo
Why test conditions matter:
All thermal manikin tests are conducted under controlled conditions:
- Still air (no wind)
- Static position (no movement)
- Dry fabric (no moisture)
Real-world conditions differ dramatically. Wind, movement, and moisture all reduce performance. This is why a jacket rated 4.0 clo in the lab might only perform at 3.2 clo in windy mountain conditions.
Red flag: If a brand publishes only fill weight and temperature rating without thermal manikin data (clo units), they’re hiding performance information. Brands confident in their engineering publish actual test results.
Blue flag: If a brand publishes “ASTM F1291 tested” or “ISO 11092 tested” with clo values, they’re transparently sharing actual thermal performance. This transparency signals confidence.
💰Save More with Our Discounts & Coupons!

How to Identify and Shop for Advanced Jackets
Shopping for advanced thermal engineering requires knowing what to look for.
Where to find spacer-stitched jackets:
- Premium brand websites: Rab, Arc’teryx, Patagonia
- Premium outdoor retailers: REI (Pro tier), Backcountry, Steep & Cheap
- Specialty alpine retailers: Mountain Collective retailers, climbing specialty shops
- Price tier: $350–600 (search filters by price range)
Product spec keywords to look for:
- “Spacer stitching”
- “3D stitch” or “3D stitching”
- “Low-compression stitching”
- “Engineered seam spacing”
- “Factory heat-sealed tape”
- “Offset baffles” or “overlapping baffles”
- “ISO 11092 tested” or “ASTM F1291 tested”
Performance indicators in product descriptions:
- Clo values published (evidence of thermal testing)
- Specific brands mentioned (Arc’teryx, Rab, Patagonia, La Sportiva)
- Expedition or alpine-specific language
- References to recent technology or innovations
Reading customer reviews strategically:
Look for comments indicating:
- “No cold lines even sitting still” = Spacer stitching or offset baffles
- “Sealed seams visible on interior” = Standard sealed stitch-through
- “Extremely bulky when packed” = Box-wall construction
- “Cold spots noticeable in wind” = Unsealed or poorly sealed seams
- “Warm for the weight” = Efficient baffle construction
Price benchmarks :
- Unsealed stitch-through: $250–400
- Sealed stitch-through: $300–500
- Spacer-stitched stitch-through: $350–600
- Offset baffles: $400–650
- Box-wall: $500–900
Expected price evolution:
- Spacer stitching will drop $50–100 per jacket as manufacturing scales up (2026–2027)
- Offset baffles will become more common in mid-range brands ($350–500) within 2 years
- Sealed stitch-through will remain the best value for active users
Timeline to mainstream adoption:
- 2025: Spacer stitching limited to premium brands only
- 2026: Expect 2–3 mid-range brands to adopt spacer stitching
- 2027–2028: Spacer stitching becomes standard in $400+ jackets
- 2030+: Spacer stitching could be mainstream across all brands, similar to Gore-Tex adoption
Professional Sealing vs. Factory Spacer Stitching: Making the Choice
If you already own a jacket without advanced sealing, you face a decision: upgrade it with professional sealing, or replace it with a spacer-stitched jacket.
Professional sealing of existing jacket:
Cost: $80–120 per jacket
Durability: 4–5 seasons
Thermal recovery: 60–75% of lost insulation
Installation time: 1 week (turnaround time at shop)
When to choose this: You own a high-quality jacket (600+ fill power) that’s missing sealing. Professional sealing extends its life and warmth significantly. Best for jackets worth $300+.
Replace with new spacer-stitched jacket:
Cost: $350–600
Durability: 10+ years (engineered into structure)
Thermal recovery: 70–80% of stitch-through baseline (engineered, not recovered)
Installation time: Immediate (factory-made)
When to choose this: You’re ready to upgrade to new technology, or your current jacket is old/worn and needs replacement anyway. Spacer stitching is future-proofing your purchase.
Comparison for a $500 jacket:
| Approach | Total Cost | Warmth Gain | Timeline |
|---|---|---|---|
| Professional seal ($500 jacket) | $80–120 | +60–75% recovery | 1 week |
| Buy new spacer-stitched ($500) | $500–600 | 70–80% of stitch-through baseline | Immediate |
| Buy new offset baffle ($500) | $500–650 | 90% of box-wall performance | Immediate |
Decision rule:
- If current jacket is <3 years old and $300+: Professional sealing is cost-effective
- If current jacket is 5+ years old or $200 or less: Replace with new spacer-stitched technology
- If you want maximum warmth: Offset baffles offer better warmth-to-weight than new spacer-stitched
- If you want bleeding-edge technology: Spacer stitching shows you’re an early adopter
Frequently Asked Questions
Spacer stitching is only available in premium brands (Rab, Arc’teryx, Patagonia) and premium price tiers ($350+). It requires specialized stitching machinery, which is expensive to install and maintain. Only high-volume manufacturers can justify the capital investment right now.
However, this is changing rapidly. Expect spacer stitching to appear in mid-range jackets ($250–400) within 2–3 years as manufacturers adopt the technology and equipment becomes less specialized. For now, if you see “spacer stitch,” you’re buying cutting-edge technology and paying for the privilege of early adoption.
Spacer stitching was only published in peer-reviewed form in 2025. Mainstream adoption typically follows a 5-7 year curve for textile innovations:
Years 1–2 (2025–2026): Premium brands only
Years 3–4 (2027–2028): Mid-range brands begin adoption
Years 5–7 (2029–2031): Mainstream adoption; becomes industry standard
Compare this to Gore-Tex, which took 10+ years to become ubiquitous. Spacer stitching will likely be faster because it’s simpler to implement.
It depends on your timeline and budget:
Buy now (sealed stitch-through) if:
You need a jacket within the next 6 months
Your budget is $300–500
You’re an active user (80%+ movement)
You don’t need bleeding-edge technology
Wait for spacer stitching (2026–2027) if:
You have 1–2 years before you need a jacket
You’re willing to pay $350–600 for cutting-edge tech
You want a jacket to last 10+ years (future-proofing)
You’re a static-use buyer (hunting, mountaineering camps) who values every degree of warmth
For most buyers, a sealed stitch-through jacket bought today is cheaper and adequate. But if you’re buying a jacket to keep for a decade, spacer stitching future-proofs your purchase against better construction becoming the standard.
In still air: Spacer stitching (3.5–3.7 clo) underperforms box-wall (4.4 clo) by about 18–20%
In wind: Spacer stitching (3.4–3.5 clo) performs nearly identically to box-wall (4.0 clo)
For static extreme cold: Box-wall is superior; the extra warmth matters
For mixed use (active + static): Spacer stitching is superior; the weight savings outweigh the 3–5% warmth deficit
The trade-off: Box-wall is warmer; spacer stitching is lighter. Choose based on whether you need maximum warmth or maximum packability.
Only partially. Advanced sealing prevents thermal bridging at stitch points, but if down is wet from sweat, the down itself has lost loft and warmth regardless of sealing.
The real solution is pairing good sealing with adequate breathability (MVTR—Moisture Vapor Transmission Rate) so moisture escapes before damaging the down insulation. One without the other is incomplete.
Advanced engineering + poor breathability = disappointing performance
Advanced engineering + good MVTR = optimal thermal system
This is why buying decisions must consider both baffle construction AND breathability rating.
Offset baffles resist down migration much better than stitched-through due to their baffle structure, but they’re not completely migration-proof. Over 5–10 years, some down can shift.
However, the staggered design means migration is slower and more uniform across the jacket. You won’t develop distinct cold spots the way you do with stitched-through baffles.
To maintain performance:
Store in a mesh bag (not compressed) during off-season
Gently redistribute down manually every 1–2 years if visible clumping develops
Avoid extreme compression in stuff sacks
Proper care keeps offset-baffle jackets performing well for 10+ years.
Key Takeaways
- Spacer stitching is the 2025 game-changer: If you’re buying a new stitch-through jacket in 2025+, look for spacer stitching. It eliminates seam compression without the weight of box-wall—this is cutting-edge technology worth the premium. Within 5 years, it could become the industry standard.
- Moisture and sealing are a system, not separate problems: Advanced sealing works best paired with good breathability (MVTR). Neither alone is sufficient for complete thermal performance.
- Offset baffles are the best compromise: For mixed-use activities, offset baffles deliver 90%+ of box-wall warmth with significantly less weight. They’re becoming the premium standard for serious mountaineers.
- Cost-benefit analysis: Spacer stitching adds $30–80 to jacket cost and lasts the life of the jacket. DIY sealing costs $50–120 and lasts 2–3 seasons. For frequent users, spacer stitching is more cost-effective long-term.
- Advanced technology still follows the trade-off: No jacket achieves maximum warmth, minimum weight, and minimum cost simultaneously. Spacer stitching reduces the compromise but doesn’t eliminate it.
- Early adoption has a premium: Spacer stitching costs more today because manufacturing is limited. Prices will drop 20–30% within 2–3 years as adoption spreads.
- Real-world conditions matter more than lab specs: Wind, movement, and moisture all reduce performance. Choose a jacket engineered for your specific activity, not just the highest thermal rating.