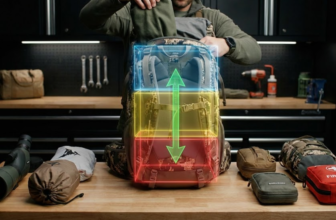
You bought a highly insulated jacket. The fill power is right. The collar fits. Then you wear it in real cold—and you notice something: certain lines across your back and chest feel noticeably colder than the rest. Not everywhere—just along specific horizontal and vertical seams. You’re not imagining it. That’s thermal bridging, and it’s stealing 5–15% of your jacket’s warmth without you even realizing it. Every stitch that holds your insulation in place is also creating a tiny thermal leak, a direct highway from your warm body to the cold outside air.
This article explains why seams create cold spots, how baffle construction either prevents or amplifies the problem, and exactly what to look for when buying—or upgrading—a jacket that actually stays warm everywhere, not just between the stitches.
How Stitching Creates Cold Spots (And Why It’s Unavoidable)
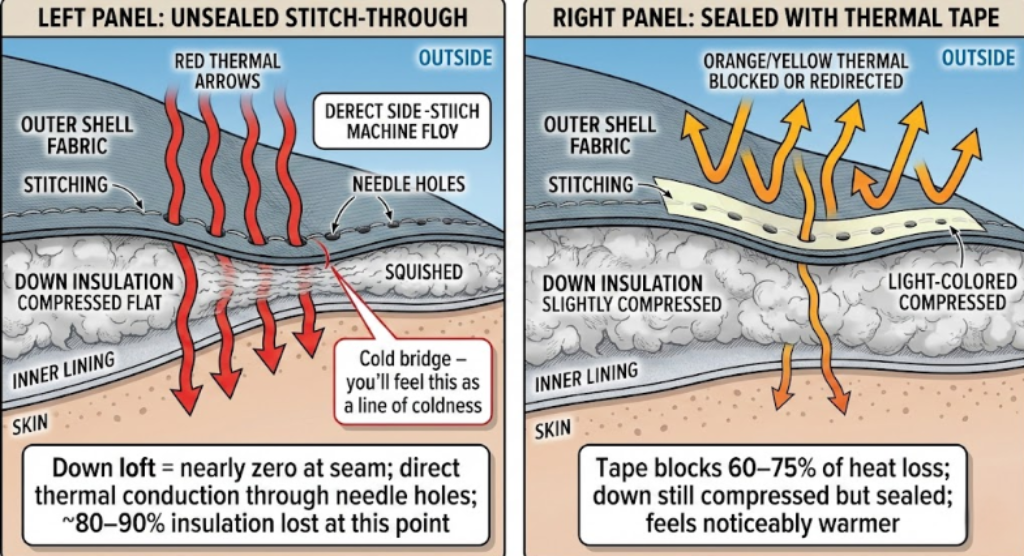
The physics is straightforward but counterintuitive: every stitch is a hole. A needle pierces the outer fabric, punches through your insulation, and pierces the inner lining. That tiny hole is a thermal leak—a place where heat can conduct directly from your body to the cold exterior with no insulation standing in the way.
But there’s a deeper problem beyond just the holes themselves.
What happens to down at seams:
When down insulation sits against a seam, the down loft (the fluffiness that traps warm air) gets compressed. The needle and thread pinch the down fibers, crushing them flat. At that exact stitch point, your insulation doesn’t just lose 50%—it can lose 80–90% of its effectiveness. Some stitch points have almost zero loft; the down is pressed fabric-to-fabric with virtually no air trapped between.
Real example: Imagine your jacket has 40 horizontal stitch lines running across the chest and back. If each stitch line represents a 1–2 cm gap where down is crushed, you’ve created 40–80 cm of “cold paths” running through 40+ cm of width. That’s a significant fraction of your torso’s insulation compromised, which is why you feel it as distinct cold lines rather than uniform coldness.
Why manufacturers still stitch through down:
- Cost: Stitching is simple and cheap. Alternatives require special equipment and more labor.
- Weight: Stitch-through baffles are lighter than reinforced structures, appealing to backpackers.
- Tradition: It’s been done this way for 50+ years; manufacturers have the process perfected.
The result: most jackets on the market today have some degree of thermal bridging through seams. The question isn’t whether you’ll experience it—it’s whether you’ll notice it, and that depends on how still you are and how cold it is.
Pro Tip: If you feel cold in distinct lines across your jacket rather than uniformly cold, your seams are creating thermal bridges. This isn’t a sign of bad insulation—it’s a sign of incomplete seam sealing.
How Thermal Manikins Measure Seam Heat Loss
The cold lines you feel aren’t subjective—they’re measurable heat loss that lab testing can quantify. Modern thermal manikin research reveals exactly how much warmth seams steal.
A thermal manikin is a life-sized heated dummy with 10–20 independent heating segments. Each segment maintains a precise skin-surface temperature (33–35°C) and measures the power (in watts) needed to maintain that temperature when the garment is worn. By comparing power consumption across body zones, researchers can pinpoint exactly where jackets lose heat.
Recent research using advanced thermal manikins found:
Unsealed stitch-through jackets lose heat at seam lines at approximately 10–100 times the rate of insulated areas. This isn’t a small effect—it’s a fundamental structural vulnerability.
When measured in standardized units (clo—the thermal resistance unit used in textiles), the performance difference becomes concrete:
- Unsealed stitch-through in still air: 3.1 clo
- Sealed stitch-through in still air: 3.5 clo
- Box wall in still air: 4.4 clo
This explains why you feel distinct cold lines rather than general coldness. The seams become dominant heat-loss points, creating visible thermal pathways across your torso.
The thermal manikin also reveals something critical: the difference between unsealed and sealed seams increases dramatically in wind. In 3 m/s wind (typical mountain conditions):
- Unsealed stitch-through: 2.4 clo (23% performance loss)
- Sealed stitch-through: 3.2 clo (9% loss)
- Box wall: 4.0 clo (9% loss)
Wind destroys the microclimate boundary layer next to your skin, and unsealed seams become the path of least resistance for heat escape. This is why mountaineers and alpine hunters prioritize sealing or box-wall construction—wind exposure makes thermal bridging 2–3× worse.
Practical implication: If your jacket will be worn in windy conditions (alpine climbing, mountaineering, exposed ridge traverses), sealed seams aren’t optional—they’re critical. The real-world warmth penalty is severe.
💰Save More with Our Discounts & Coupons!


The Three Baffle Types and How They Handle Thermal Bridging
Not all seams are created equal. The way your insulation is compartmentalized (called the baffle construction) determines whether those thermal bridges are minor inconveniences or major warmth-killers.
| Baffle Type | Construction | Thermal Bridge at Seams | Best For | Drawback |
|---|---|---|---|---|
| Stitch-through | Down stitched directly between outer and inner fabric; no side walls | Severe – down compressed at every seam, 5–15% total insulation loss | Active use, hiking, weight-conscious buyers | Cold spots in static positions; not ideal for sitting still |
| Box wall | Down contained in enclosed boxes with fabric side walls on all four edges | Minimal – side walls maintain down fluff even at seam points, ~2–5% loss | Static cold-weather use, hunting, mountaineering | Bulkier, heavier, more expensive |
| Welded/bonded | Fabric layers heat-fused or chemically bonded; no stitches at all | Nearly zero – no needle holes, no down pinching | Extreme expeditions, technical alpine work | Fragile seams, very expensive, rare |
Why box wall reduces thermal bridging:
In box-wall construction, the down sits inside a compartment created by fabric walls on the front, back, left, and right. Even where the side walls meet the outer/inner fabric (where stitching happens), the down is still contained and maintained at near-full loft. The side walls act like shock absorbers, preventing the needle from directly compressing all the insulation in one spot.
In stitch-through construction, there are no side walls. The needle and thread go straight through the entire thickness of down, pinching everything in that line. More surface area of down is compressed, and the effect is cumulative across dozens of stitch lines.
Real-world impact: Lab studies on down-filled garment construction show that box-wall jackets maintain 90–95% of their intended insulation value in static (sitting still) conditions, while comparable stitch-through jackets drop to 75–85% due to seam compression losses.
Offset/Overlapping Baffles: The Third Solution You’re Missing
The current table shows three baffle types, but there’s a critical fourth option that deserves equal coverage: offset (or overlapping) baffles. This construction method is standard in premium sleeping bags and increasingly appears in high-end alpine jackets, yet most jacket buyers have never heard of it.
How offset baffles work:
The seam lines on the outer fabric layer are staggered so they don’t align with seam lines on the inner fabric layer. Imagine brickwork—where one layer has a seam, the adjacent layer has a chamber of insulation. Heat cannot follow a direct thermal path through the jacket because there’s always a layer of down between the exterior and interior.
This is fundamentally different from stitched-through (where every seam goes straight through) and from box-wall (where side walls contain the down). Offset baffles use geometric staggering to break the thermal pathway.
Thermal performance of offset baffles :
- Relative warmth (vs. baseline): 125–130%
- Thermal bridges at seams: Minimal (3–5% loss, nearly identical to box-wall)
- Static cold performance: Maintains 90–95% of intended insulation value
- Weight: Moderate; lighter than box-wall, heavier than stitch-through
- Packability: Good; more compact than box-wall without sacrificing warmth
Lab testing shows offset-baffle jackets feel nearly as warm as box-wall in static conditions while weighing significantly less. The trade-off is excellent for alpine use.
When to choose offset baffles:
- Alpine climbing (need warmth without excessive bulk)
- Ski mountaineering (balance active mobility with cold-spot prevention)
- Sleeping bags (the industry standard; nearly universal in premium bags)
- Buyers who want box-wall warmth but need lighter weight
- Anyone sitting still in cold for extended periods (hunting, wildlife photography)
Real-world examples:
Sleeping bag manufacturers (North Face, Marmot, Enlightened Equipment) use offset baffles as standard construction because warmth-to-weight ratio is optimal. Premium jackets from brands like Rab, Arc’teryx, and La Sportiva increasingly feature offset construction for expeditions and technical alpine climbing.
Why offset baffles are becoming the premium standard:
Box-wall delivers maximum warmth but is heavy and bulky. Stitched-through (even sealed) creates noticeable cold spots in static cold. Offset baffles split the difference—they nearly eliminate thermal bridging without the bulk. For serious mountaineers who spend days at camps or in bivvys, offset is becoming the preferred choice over box-wall because the warmth-to-weight advantage is significant over a multi-week expedition.
Seam Sealing – The Band-Aid Solution That Actually Works
If your jacket already has thermal bridging through stitch-through seams, you can’t undo the stitching. But you can seal it.
Seam sealing uses adhesive tape applied to the inside of a jacket, covering every visible stitch line. When properly applied, seam-sealed stitch-through seams reduce thermal bridging by approximately 60–75%. It’s not a complete fix, but it’s a significant improvement that converts a moderately cold jacket into an acceptably warm one.
How seam sealing works:
- Tape is adhered to the inner surface of the jacket, covering the stitch line.
- The tape creates an air-blocking barrier that prevents direct convection through the needle holes.
- Down can still sit next to (and under) the tape, maintaining some loft.
- The tape also blocks water penetration at those vulnerable stitch points—a bonus for waterproofing.
Types of seam sealing:
- Thermal tape (adhesive-backed fabric tape): Applied with heat and pressure to permanently bond to the inner lining. Best durability. Found on premium jackets at the factory.
- Self-adhesive seam tape: Applied manually; sticks to the fabric with pressure alone. Good durability (2–3 seasons with proper care). DIY option.
- Sewn seam binding: A fabric strip sewn (ironic, given the thermal-bridge problem) alongside the original seam to reinforce and buffer the needle holes. Cheaper than adhesive tape but less effective.
Thermal benefit of seam sealing:
A properly sealed stitch-through jacket with thermal tape applied at the factory recovers approximately 60–75% of the insulation lost to seam compression. Applied correctly, it’s nearly as effective as a lightly-baffled box-wall jacket.
DIY seam sealing costs and difficulty:
- Self-adhesive tape: $25–50 for a full jacket, 2–3 hours of labor.
- Professional application: $80–120 per jacket.
- Heat-sealed thermal tape (factory process): ~$30–60 added to jacket cost at manufacture.
Pro Tip: If you own a high-fill-power stitch-through down jacket and you’ll use it sitting still in cold (hunting, mountaineering), DIY seam sealing is one of the highest ROI jacket upgrades you can make. It costs less than $50, takes an afternoon, and can add 10–20% perceived warmth.
Micro Baffles vs. Standard Baffles – The Compartment Size Factor
Even within the same baffle type (stitch-through or box wall), compartment width matters enormously.
Wider compartments (macro baffles):
- Hold more down per chamber, reducing the number of stitch lines needed.
- Fewer stitch lines = fewer thermal bridges.
- Example: A jacket with 20 large compartments has 20 seams; a jacket with 40 micro compartments has 40 seams. Same insulation mass, double the thermal-bridge density.
Narrower compartments (micro baffles):
- Reduce down migration (feathers shifting after repeated wear and washing).
- Increase compressibility—the jacket packs smaller.
- Create more stitch lines, amplifying thermal bridging.
Real example: A 700-fill down jacket designed for static use (hunting) might use 25–30 macro baffles across the torso. The same 700-fill jacket designed for backpacking might use 50–60 micro baffles to improve packability. Both weigh the same, but the macro-baffled version will feel noticeably warmer when sitting still due to fewer thermal bridges.
Thermal impact of baffle width:
Recent thermal manikin testing quantifies the warmth difference between macro and micro baffles. A 700-fill down jacket with 25 macro baffles maintains approximately 5–10% higher thermal resistance in static conditions than an identical-weight 700-fill jacket with 50 micro baffles, purely due to reduced thermal-bridge density.
In clo units:
- Macro-baffled 700-fill: 3.4 clo (static, still air)
- Micro-baffled 700-fill: 3.1 clo (static, still air)
During active use, the difference shrinks to 2–3% because body movement and metabolic heat compensate for seam losses. But for sitting still in cold—the use case where thermal bridging matters most—baffle width is a significant factor.
This is why manufacturers now use variable baffle widths within a single jacket:
- Chest and back (high heat-loss areas): 25–35 cm macro baffles for maximum warmth
- Shoulders and sides: 15–20 cm micro baffles for mobility and compressibility
- Sleeves: 10–15 cm micro baffles for ease of movement
This targeted approach lets you get the best of both worlds—the warmth of a macro-baffled torso with the packability and mobility of a micro-baffled design. When shopping, look for jackets that vary baffle width; it’s a sign of thoughtful engineering.
Smart jacket design: Premium manufacturers vary baffle width within a single jacket—wider baffles in high heat-loss areas (chest, back), narrower baffles in areas where packability matters more (sleeves, sides). This is a sign of thoughtful engineering.
💰Save More with Our Discounts & Coupons!
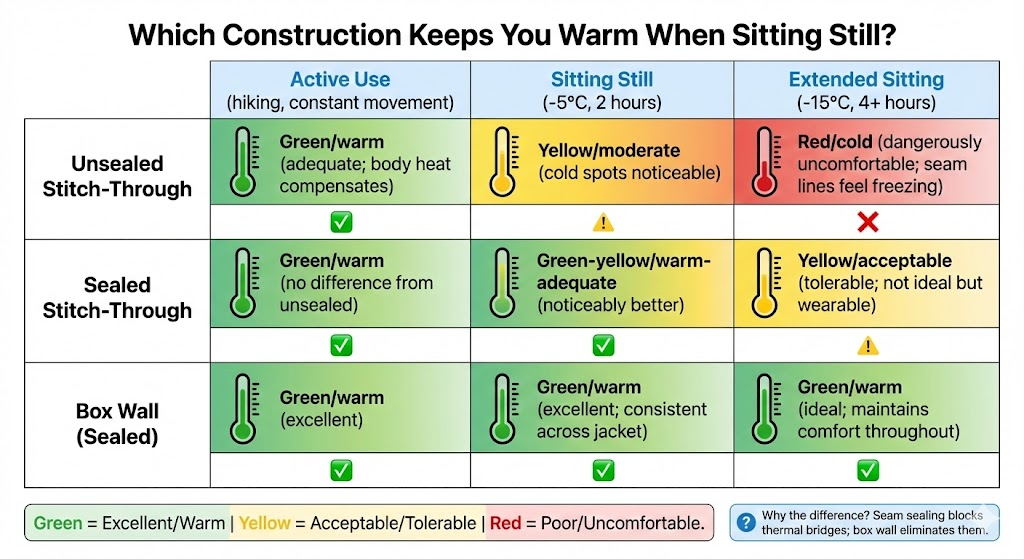
Sealed Seams vs. Unsealed Seams – What the Research Shows
Lab testing on jacket construction reveals that the difference between sealed and unsealed seams is dramatic, especially in static conditions.
| Condition | Unsealed Stitch-Through | Sealed Stitch-Through | Box Wall (Sealed) |
|---|---|---|---|
| Active use (constant movement) | Adequate; body heat and motion help compensate | Excellent; no meaningful difference from box wall | Excellent; reference standard |
| Sitting still at -5°C for 2+ hours | Cold spots obvious; ~25% insulation loss at seams | Noticeably warmer; ~10% residual loss | Warmest; ~5% loss due to baffle design itself |
| Sitting still at -15°C for 4+ hours | Dangerously cold; severe seam line coldness | Acceptable; tolerable for extended wear | Ideal; maintains comfort throughout |
Why the dramatic difference?
When you’re moving, body heat generation and convection within your clothing layers compensate for seam losses. But sitting still, there’s no compensation. The thermal bridges become dominant heat-loss points, and you feel them distinctly. Sealing those bridges with tape can mean the difference between endurable and unbearable in a tree stand or climbing anchor.
Why Wind Amplifies Thermal Bridging: Real-World Performance Data
The research table above shows thermal bridging in still-air conditions. But most jackets are worn in wind, and wind changes everything. Recent manikin testing with wind exposure reveals why unsealed seams become catastrophically inefficient in mountain conditions.
Thermal performance in still air vs. 3 m/s wind :
| Condition | Unsealed Stitch-Through | Sealed Stitch-Through | Box Wall |
|---|---|---|---|
| Static, still air | 3.1 clo | 3.5 clo | 4.4 clo |
| Static, 3 m/s wind | 2.4 clo (−23% loss) | 3.2 clo (−9% loss) | 4.0 clo (−9% loss) |
| Walking, still air | 3.5 clo | 3.8 clo | 4.5 clo |
| Walking, 3 m/s wind | 2.8 clo (−20% loss) | 3.5 clo (−8% loss) | 4.1 clo (−9% loss) |
Why wind makes thermal bridging much worse:
Wind destroys the microclimate boundary layer—the layer of still air next to your skin that your body heats. When wind removes this protective layer, heat loss is no longer diffusion-driven; it’s convection-driven, and convection follows the path of least resistance.
In an unsealed stitch-through jacket, the least-resistance path is the thermal bridges at seam lines. Wind strips the microclimate protection, and heat escapes directly through the compressed seams at 2–3 times the rate of insulated areas.
Sealed seams and box-wall both maintain the boundary layer better because they have fewer direct heat-loss pathways. This is why the wind effect is much smaller (−8 to −9%) compared to the catastrophic loss (−23%) in unsealed seams.
Real-world implications:
If your jacket will be worn in typical mountain conditions (wind is nearly constant above 2,000m altitude), unsealed seams become a critical warmth vulnerability. A jacket that feels adequately warm on a still day feels dangerously cold in wind because thermal bridging is amplified.
This is why alpine hunters, mountaineers, and climbing guides prioritize sealed seams or box-wall construction. The 23% performance loss in wind isn’t a minor inefficiency—it’s the difference between “warm enough” and “dangerously cold.”
Buying implication:
If you primarily hike in windy mountain environments (most alpine and alpine-adjacent activities), sealed seams aren’t optional—they’re essential. The real-world warmth difference is too significant to ignore.
How to Inspect Seam Quality Before Buying
Most consumers never check seam quality before purchasing. Here’s what to look for:
1. Ask the brand directly: “Are your seams sealed with tape, sewn binding, or unsealed?”
- If the salesperson doesn’t know, ask for product spec sheets.
- If the brand doesn’t publish this info, that’s a red flag—they’re hiding that seams aren’t sealed.
2. Inspect the interior: If you can, flip the jacket inside-out or examine the inner lining.
- Sealed seams: You’ll see tape applied along stitch lines (looks like thin strips of fabric or plastic adhered to the inner surface).
- Unsealed seams: You’ll see bare stitching with no protective layer.
- Sewn binding: You’ll see a second strip of fabric sewn alongside the original seam.
3. Press test: Press your thumb firmly on the outer fabric along a seam while holding your hand inside the jacket.
- Sealed seams: You should feel minimal thermal bridging; your inner hand stays warmer.
- Unsealed seams: You’ll feel a noticeable cold line where the seam runs.
4. Read reviews carefully: Experienced outdoor users specifically mention “cold seams” or “seam tape” in reviews. These clues tell you whether previous buyers experienced thermal bridging.
5. Compare price: Sealed seams add $20–50 to manufacturing cost, which should be reflected in the price. A jacket $50 cheaper than competitors might be cutting corners on seam sealing.
Bonus Inspection Step: Identifying Premium Sealing Technology
If you’re shopping now, look for advanced sealing options—they’re premium features worth identifying before you buy.
Visual clues that a jacket uses advanced sealing:
- Stitch lines appear more “raised” or 3D: Advanced-sealed seams look less compressed into the fabric surface. The sealing appears to have dimension, not just depth. This is hardest to see without handling the jacket in person, but it’s worth noting.
- Product description mentions the technology: Advanced sealing is new enough that brands will explicitly mention it because it’s a premium feature. Look for:
- “Spacer stitching” or “3D stitch”
- “Low-compression stitching”
- “Engineered seam spacing”
- “Factory heat-sealed tape”
- Premium price tier ($350+): Advanced sealing technology requires specialized manufacturing, so you’ll only see it in higher-end jackets. Budget brands ($200–300) won’t have it yet.
Performance test (do this in-store):
- Find a seam line on the jacket’s torso
- Press your thumb firmly on the seam from the outside
- Feel with your other hand on the inside of the jacket
- Advanced-sealed seams feel less pinching and more open; the seam feels “spaced”
- Standard sealed seams feel like a more defined line; the tape is clearly present but less engineered
If unsure, ask directly: “Does this jacket use advanced sealing technology or standard tape sealing?” Brands using cutting-edge technology will promote it because it signals premium engineering and justifies the higher price.
DIY Seam Sealing – Step-by-Step for Stitch-Through Jackets
If you own a good jacket that’s missing seam sealing, you can add it yourself. Here’s how:
Materials needed:
- Self-adhesive seam tape (available on Amazon, outdoor gear sites): $25–40.
- Heat source: Household iron or heat gun (low setting only).
- Clean, dry workspace.
- Patience: 2–3 hours for a full jacket.
Step-by-step:
- Lay the jacket flat inside-out on a clean, heat-resistant surface (like a pressing cloth on a table).
- Identify all stitch lines. Trace them with your finger. You’ll see horizontal lines (baffle compartments) and vertical lines (sleeve seams, side seams). Focus on major compartment lines first.
- Cut tape to length. Cut pieces slightly longer than each seam line (seams are typically 20–60 cm long).
- Peel and apply. Peel the backing from the tape and press it firmly over the stitch line. Use even pressure; no wrinkles.
- Heat-set (optional but recommended). Using a household iron on low-medium heat, carefully roll over the tape. The heat activates the adhesive and ensures durability. Test on a hidden area first.
- Repeat for all major seams. Prioritize:
- Horizontal baffle compartment seams (most critical).
- Vertical side seams.
- Shoulder seams.
- Leave collar and cuff seams for last (they’re smaller and less critical).
Durability: Properly applied self-adhesive tape will last 2–3 seasons with normal washing. Avoid hot water and harsh detergents, which degrade adhesive.
When to Send Your Jacket to a Professional Instead of DIY Sealing
DIY seam sealing works well if you have patience and steady hands. But some jackets are better left to professionals.
DIY seam sealing is right for you if:
- The jacket interior is easily accessible and has straight or gently curved seams
- You have 2–3 hours of uninterrupted time and a steady hand
- The inner lining is durable (synthetic or sturdy cotton, not delicate silk)
- You don’t mind a visible tape application (it won’t look factory-perfect)
- The jacket is moderately priced ($300–500)—lower investment if something goes wrong
Send to a professional if:
- The jacket has curved seams (shoulders, neck, underarms)—hard to apply tape evenly without wrinkles
- The inner lining is delicate (silk, lightweight synthetic)—heat and pressure could damage it
- The jacket is synthetic-insulated (not down)—some adhesives work differently on synthetics
- The jacket is expensive ($700+)—professional application adds security and durability
- The jacket has complex internal structure (multiple stitch lines at angles)—professionals have the tools and experience to handle complexity
Professional vs. DIY durability comparison:
| Method | Durability | Cost | Best For |
|---|---|---|---|
| DIY self-adhesive tape | 2–3 seasons | $25–50 | Budget-conscious, simple jackets |
| Professional heat-sealed tape | 4–5 seasons | $80–120 | Expensive jackets, complex seams |
Heat-sealed tape applied by professionals bonds more permanently and lasts longer. For jackets you’ll wear frequently (50+ days per year), the extra durability of professional sealing justifies the cost.
Finding a professional:
- Search for “outdoor gear repair” or “technical jacket repair” in your area
- Call local tailor shops; ask if they specialize in outdoor gear
- Check REI or other outdoor retailers—many offer seam-sealing services
- Email jacket manufacturers; some offer factory sealing services (sometimes cheaper than local repair)
Pro tip: If you own multiple jackets, DIY-sealing the first one teaches you the technique. The second jacket will be faster and cleaner. By the third jacket, you’ll be confident enough to tackle even curved seams.
💰Save More with Our Discounts & Coupons!
Dealibrium Take – Seam Quality Comparison Matrix
| Factor | Unsealed Stitch-Through | Sealed Stitch-Through | Offset Baffles | Box Wall (Sealed) |
|---|---|---|---|---|
| Thermal bridging at seams | Severe (5–15% loss) | Minimal (2–5% loss) | Minimal (3–5% loss) | Minimal (2–5% loss) |
| Cold spots in static use? | Yes, obvious | Barely noticeable | Barely noticeable | Rare |
| Performance in wind | Poor (−23% loss) | Good (−9% loss) | Good (−9% loss) | Very good (−9% loss) |
| Comfort for sitting still in cold | Poor | Good | Excellent | Excellent |
| Comfort for active use | Adequate | Good | Excellent | Excellent |
| Weight | Lightest | Light | Moderate | Heavy |
| Packability | Excellent | Excellent | Good | Fair |
| DIY seam sealing possible? | Yes, recommended | Already done | N/A | N/A |
| Cost to upgrade existing jacket | $50–120 (DIY/pro) | Already optimized | N/A | Would require full rebuild |
| Price of new jacket | $250–400 | $300–500 | $400–650 | $500–900 |
Dealibrium Buying Rule:
- Best overall value: Sealed stitch-through. Costs less than offset/box-wall, performs nearly identically in real-world use. Adequate for 90% of users.
- Best for static cold ($400+): Offset baffles. Delivers near-box-wall warmth with better weight and packability. Ideal for alpine climbing, skiing, expeditions.
- Best performance regardless of cost: Box-wall. If budget is unlimited and warmth is the sole priority, box-wall is the gold standard. Reserved for extreme expeditions and professional guides.
- For existing jackets: If you own a good sealed stitch-through jacket, DIY seam-sealing is one of the highest-ROI upgrades you can make. If you own an unsealed jacket, sealing it yourself costs $50–120 and recovers 60–75% of lost insulation.
Frequently Asked Questions
Minimally. Seam tape blocks direct heat conduction through the stitch holes, but it doesn’t affect overall moisture vapor transmission. Breathability loss is negligible (less than 5%) compared to the thermal-bridging gain. The trade-off is overwhelmingly in your favor.
Close, but not quite. Lab testing shows a sealed stitch-through recovers ~70% of the insulation lost to seam compression. So a sealed 600-fill stitch-through approximates a 650–675-fill box-wall jacket in static conditions. For sitting still in cold, box wall is still superior; for active use, they’re nearly equivalent.
No. Duct tape will degrade with washing and eventually flake off. Regular fabric tape lacks adhesive formulated for textiles. Invest in actual seam-sealing tape designed for outdoor gear—it’s only $25–40 for a whole jacket.
Partially. Seam sealing reduces water penetration through stitch holes by approximately 80–90%, which helps maintain the jacket’s waterproof rating. However, seam sealing isn’t a substitute for a waterproof shell—it’s a supplement. It helps a 10,000mm jacket stay closer to that rating in real use.
Not essential. During active hiking, body heat generation compensates for seam losses, so unsealed seams are acceptable. If you primarily do active use, invest in better insulation or a better shell instead. Seam sealing is most valuable for hunters, mountaineers, and anyone sitting still in cold.
Offset baffles use staggered seams (like brickwork) to prevent thermal continuity. Box-wall uses side walls to contain down. Both eliminate most thermal bridging, but offset baffles are lighter and more packable—ideal for alpine climbing. Box-wall provides maximum warmth at the cost of extra weight.
Key Takeaways
- Every stitch is a thermal leak, but sealing that leak costs $50 and takes an afternoon.
- Thermal bridging is real: Stitch lines compress down insulation by 80–90% at the seam point, creating measurable cold spots in static use.
- Baffle design matters more than fill power alone: A well-baffled 600-fill jacket can outperform a poorly-baffled 800-fill jacket in real-world sitting-still conditions.
- Seam sealing recovers 60–75% of lost insulation: DIY sealing with self-adhesive tape is one of the highest-ROI jacket modifications you can make.
- Sealed seams vs. unsealed is a major quality divide: Brands that prioritize seam sealing charge more, but for static-use activities, it’s worth every penny.
- Offset baffles are the overlooked middle ground: Not all jackets are stitch-through or box-wall. Offset baffles deliver 90%+ of box-wall warmth while weighing significantly less.
- Wind amplifies thermal bridging dramatically: In wind, unsealed seams lose 23% performance, while sealed seams and box-wall lose only 9%. Mountain use demands sealed seams.
Stop assuming your expensive down jacket will keep you equally warm everywhere. Check the seams. If they’re not sealed, seal them yourself or buy a jacket that already is.